Contents
Secure Messaging Systems
This department works with a lot of other agencies and organizations. Sensitive information is often sent to and received from them. In order to avoid any phishing emails, we have documented a list of messaging systems we are familiar with and have used in the past. You can review the systems on the dedicated page on Secure Messaging Systems.
Security Standards
PSAB doesn’t have any official policies on security, but this department has it’s own internal rules that must be adhered to by anyone working within the department.
Rules
- All sensitive information must be sent via the secure messaging system. This includes any amount of SSN data*. So to avoid any sort of complications, we handle all PII the same way.
* While only showing the last 4 of a social does not constitute a breach in the state of Pennsylvania:
“‘Redact.’ The term includes, but is not limited to, alteration or truncation such that no more than the last four digits of a Social Security number, driver’s license number, State identification card number or account number is accessible as part of the data.”
There may be times where we are working with people who are residents of different states. In those situations, their state of residence rules may take precedence and cause issues. - If you receive any PII from a member or vendor, it must be reported to IT so IT can assist in removing any residual copies on the mail server and from your local mail client. You must then inform the member/vendor to send sensitive information securely moving forward.
- Avoid re-using passwords, and where possible, access a system or service using the recommended secure methods. For example, using 2FA or MFA, different (no reusing) passwords.
- Be extremely cautious when reviewing mail and if there is any sort of concern for something being a phishing attempt, malicious, or viral, notify IT to review.
- All working files will be stored on the I: Drive instead of the N: Drive. The I: Drive is a special encrypted network drive allowed to store sensitive files.
- All wireless devices (such as wireless keyboard and mouse) but be reviewed by IT before use. This is because many legacy wireless devices use unencrypted connections that were vulnerable to eavesdropping. Newer devices are encrypted and protected from that, but IT can help identify if they are encrypted or not.
Computer Configuration
- Computer must be setup with an S: Drive and have all installed browsers configured to save downloads to the S: only.
- Computer must have the N: Drive removed unless necessary for any jobs outside of the UC requires it. Working out of the N: Drive is discouraged.
- Computer must be setup to lock it’s screen after 5 minutes automatically. We cannot leave computers unlocked and unattended.
- Wireless configuration on devices such as wireless printers is disabled and prohibited.
Update UC rates in iMIS
While the UC rates are accessible and editable in iMIS, there is no simple way to edit them in bulk using the interface. So what this process does is export the data as a CSV. Allow you to edit in bulk, then re-import that data back into iMIS.
Export member rates data
- Log into iMIS https://myaccount.boroughs.org/staff
- Go to PSAB → Custom IQA → UC → UC Rates Export
- Export the results as a CSV, this option is located in the Export drop-down in the upper right
Note: We use CSV as iMIS exports XLSX kinda funny, but either should work. - Make your bulk edits to the document
Import member rates data
This part should be handled by IT but documenting the process here none-the-less.
Note: The XLSX MUST contain the FEIN number in order to match on import. If this is missing, you cannot import the data.
- Re-save the now edited CSV as an XLSX (if not already an XLSX)
- Log into iDIMS https://us.cloud.csiinc.com/
- Go to iImport
- Upload the XLSX file, make sure the Spreadsheet is selecting the correct worksheet. It should show 6 columns available.
- Click on Update in the Select an Action area.
- On the Select Mappings screen, click on Load mappings, then select UCRateImport and click the Select button.
- If the CSV/XLSX doesn’t match up to the saved mapping for whatever reason, follow the settings below to manually map the fields.
- Source: Panel Data
- Table: PSAB_Programs
- Match on “FEIN” field
- Update “Uc Rate” field
- Options: Uncheck all, leave “Skip Blank Match On” checked
- If the CSV/XLSX doesn’t match up to the saved mapping for whatever reason, follow the settings below to manually map the fields.
- Click on Submit in the Submit Task area to run the task.
- After IT, imports the rates, please alert one of the UC staff so they can update the member data in Access
Update member data in Access
Currently the UC Access (ucnew.accdb) program generates reports using member data pulled from iMIS. Prior to 2017, it was pulled in via Excel spreadsheets. Later on we were able to connect directly to the SQL server and pull the data in real-time. But in 2023 with the move to iMIS EMS, we no longer have direct access to the SQL server any more and need to revert back to importing the data manually. There are two main steps involved: one is to export the data from iMIS and the other is to import it into Access.
Export the member data
- Log into iMIS https://myaccount.boroughs.org/staff
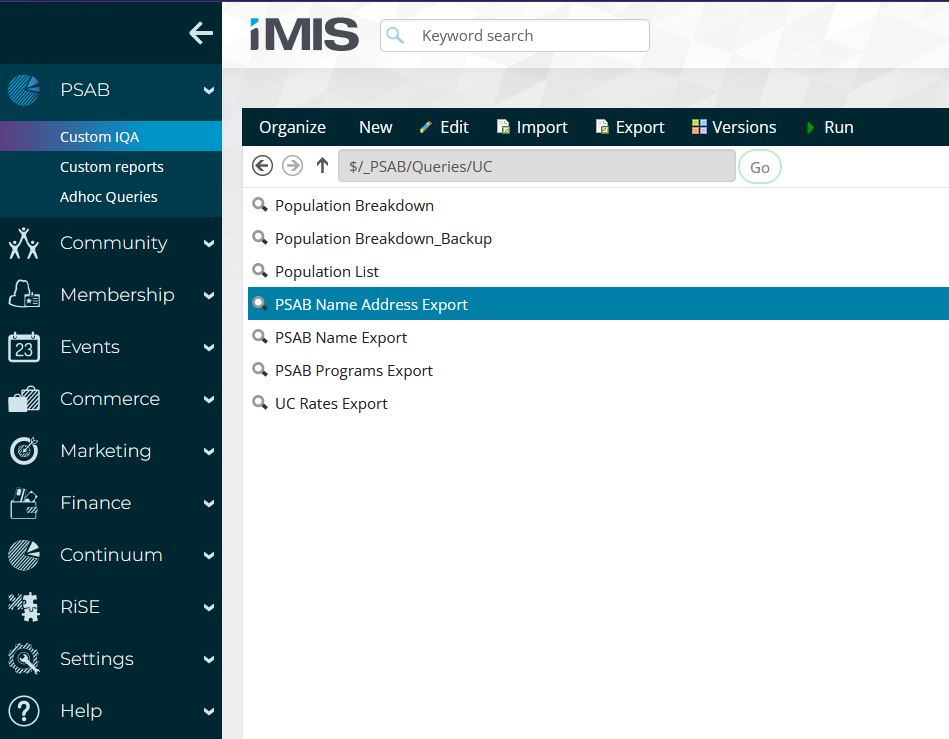
- Go to PSAB → Custom IQA → UC
- Open the IQA named PSAB Name Address Export
- Export the results as a CSV, this option is located in the Export drop-down in the upper right

- Save the exported CSV as
O:\uc\dbo_Name_Address_Export.csv
Note: Steps 5, 8, and 11 assume your browser is asking you where to save the exported file to. If your browser does NOT ask you, then just click on the folder icon from the download drop-down to open directly to where the file was saved.
Then manually rename the file and move it to the O:\uc folder accordingly. You will need to overwrite the existing files that may already be there.
- Next open the IQA named PSAB Name Export
- Export the results as a CSV
- Save the exported CSV as
O:\uc\dbo_Name_Export.csv - Next open the IQA named PSAB Programs Export
- Export the results as a CSV
- Save the exported CSV as
O:\uc\dbo_PSAB_Programs_Export.csv
Import the member data
Once the CSVs have been re-exported/updated we can import them into the UC Access program.
- Open
O:\uc\ucnew.accdb - Login with your user as usual
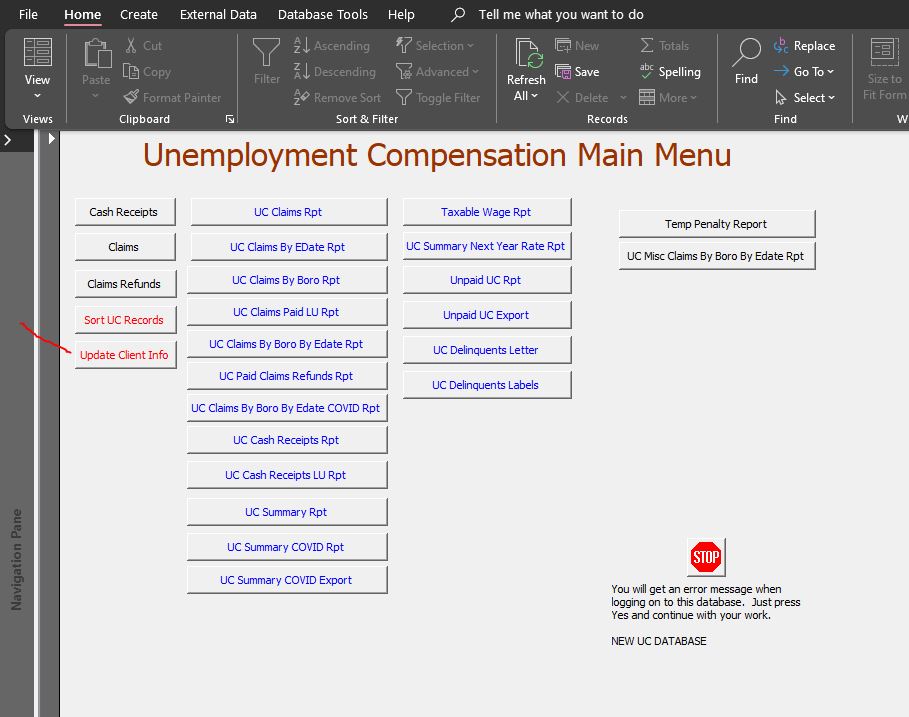
- Click on the Update Client Info button, this will run a script to pull in the data from the CSVs
Troubleshooting Access
Hide confirmation notices on each step of the scripts
Mount/Unmount Encrypted Drives
The UC uses encrypted drives located on the shared NAS (Network Attached Storage). Since they are encrypted, they must be manually unlocked before they can be accessed. This is separate from having the NAS turned on. Once unlocked, you will be able to access the data, and when done (as necessary) you can lock them again.
- Log into the UC NAS at https://192.168.1.225 using your
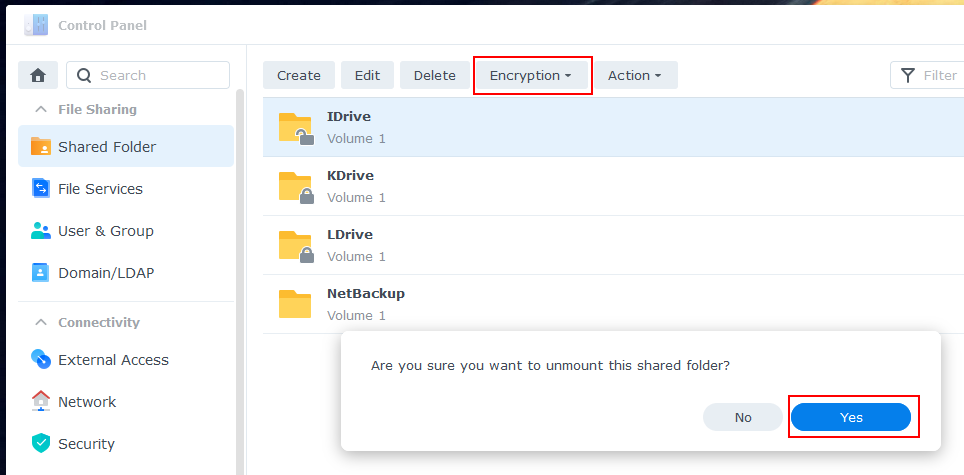
*_admincredentials which should be in yourPasswords.xlsx. - Navigate to Control Panel -> Shared Folder
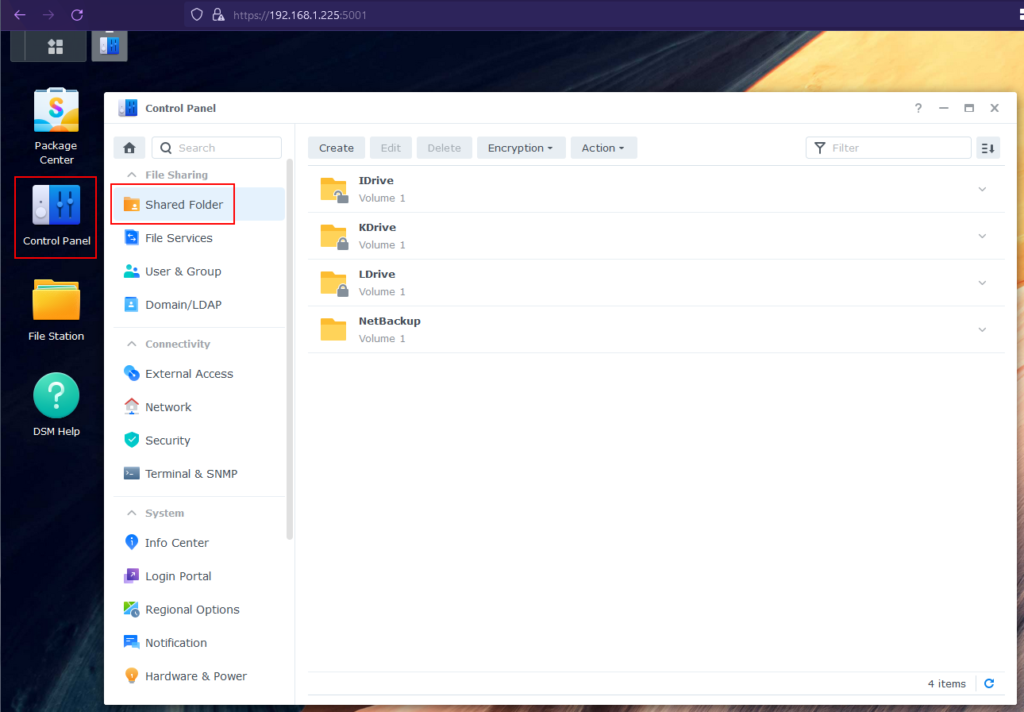
- Select the Share you would like to mount, and under the Encryption drop-down, select Mount
- It will ask for the encryption key for that share, enter it here and click OK
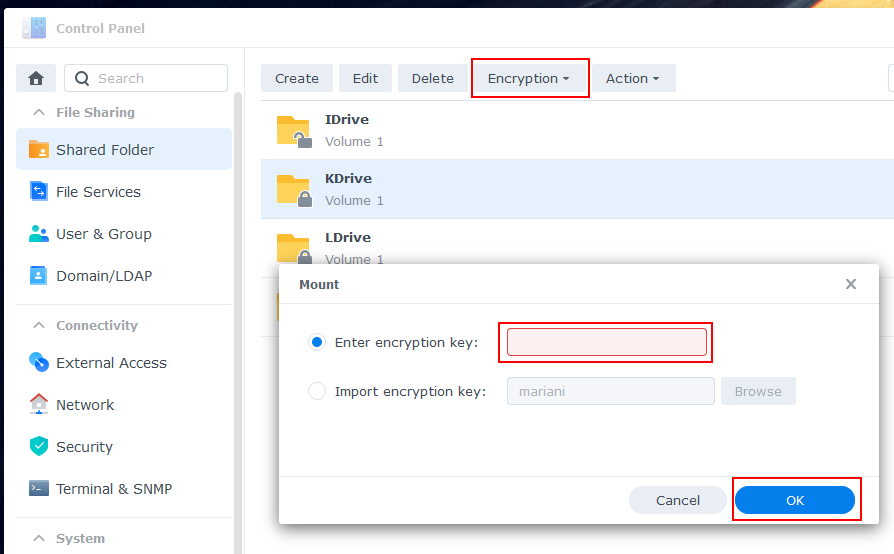
- Once mounted, you will now be able to access the corresponding drive on your computer. For example, if you unlocked “KDrive”, you will now be able to access the
K:drive on your computer. - To unmount/lock the drive, just return to the Shared Folder screen. Then select the drive you want to lock, and under the Encryption drop-down, select Unmount. It will ask if you are sure, click on Yes